|
|
|
|
 |
Simon the Pi Man
To Infinity (probably) and beyond
(A beginners Resource for the Raspberry Pi computer using the Debian distro)
|
|
If you are looking for info on the Raspberry Pi computer
stay on this site
however
If you are looking for a good cafe in
Rye in
East Sussex try
"Simon the Pie man" near the church.
|
|
| | How2 (Squeeze)->2. A Windows File Server(Squeeze) |
|
How2SetUp a Raspberry Pi Windows NAS storage server - SQUEEZE
One of a set of simple easy to use guides for beginners to set up a Raspberry Pi computer.
Ok this instruction sheet will allow you to setup a Raspberry Pi computer to act as a (NAS)Network
Addressed Storage server so it will be possible for you to access files from any/all your
windows PC's in your house using the Raspberry Pi to share the files on a disk drive attached
to one of the usb ports on the Raspberry Pi.
1. Firstly I need remote access to my pi so firstly carry out the
How2SetUp Remote Access from the menu on the left.
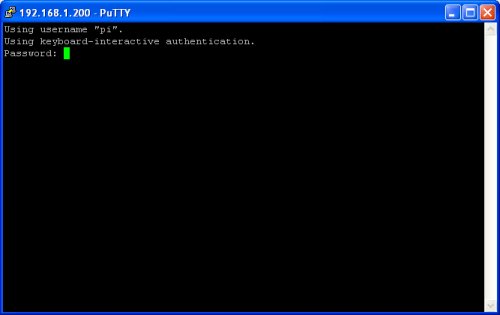
Lets connect to the Pi remotely using putty so we get the following screen.
Login using the default user pi and the default password raspberry.
2. Now lets make sure all the system updates from Debian have been applied
pi@raspberrypi~$ sudo apt-get update
lots of stuff will fly up the screen so wait until finished,
then repeat until nothing else updates - agree y to any y/n questions.
Probably a reboot is a good idea at this time so
pi@raspberrypi~$ sudo reboot
NOTE:- The disk drives that I will be attaching will be formatted in windows
format - either FAT32 or NTFS, I suggest you do this with a Windows PC and check the
drives are readable by the PC before attaching to the Pi, and also add a test file
so that you can see this while testing. You can use unix formatted drives but the
FAT/NTFS file systems will make the drives portable in case of a Pi failure.
3. Attach the disk drive or drives to the Raspberry Pi then type
pi@raspberrypi~$ sudo fdisk -l
This will show all the details of the attached disks even if you are not yet using or are able
to access them.
I have attached a powered 1Tb disk drive and a 400Mb usb card as examples, so the important
bits from the command is shown below - i have left out stuff not relevent for this How2SetUp.
-----------------------------------------------------
Disk /dev/mmcblk0: 3965 MB, 3965190144 bytes
Device Boot Start End Blocks Id System
/dev/mmcblk0p1 17 1216 76800 c W95 FAT32 (LBA)
/dev/mmcblk0p2 1233 26672 1628160 83 Linux
/dev/mmcblk0p3 26689 29744 195584 82 Linux swap / Solaris
Disk /dev/sda: 1000.2 GB, 1000204886016 bytes
Device Boot Start End Blocks Id System
/dev/sda1 1 121601 976760001 7 HPFS/NTFS
Disk /dev/sdb: 4005 MB, 4005560320 bytes
Device Boot Start End Blocks Id System
/dev/sdb1 1 486 3903763+ b W95 FAT32
-----------------------------------------------------
From the above listing you can see that I have a disk /dev/mmcblk0 (the SD Card) which
contains 3 partitions - so this is the operating system disk.
I also have /dev/sda which is a Terabyte drive which has one partition and has been
formatted in HPFS/NTFS windows NT disk format(used by Windows NT,2000,XP,Vista,Windows 7 etc).
Finally I have a disk /dev/sdb that is a 4Gb usb card with 1 partition but this time its
been formatted in a windows FAT32 format - old style formatted.
All the disk drives and partitions attached to the Pi are shown, they are all given a
device address such as /dev/sda with a partiton 1 so /dev/sda1 is the disk in the first
Pi usb port and is partition 1.
4. Now we need to make the disks available to the operating system so we need to create a point
in the filesystem to mount the disks on.
To do this we need to create a directory that the disk can be attached to, so in the
example below we will use /mnt/disk1 for the 1st Disk and /mnt/disk2 for the second.
pi@raspberrypi~$ sudo mkdir /mnt/disk1
pi@raspberrypi~$ sudo mkdir /mnt/disk2
The above commands have made 2 new directories for us to use.
To test they exist type
pi@raspberrypi~$ ls /mnt
it should show the following if all is ok
-----------------------------------------------------
disk1
disk2
-----------------------------------------------------
5. Now we need to attach the disks to these folders so we have to edit the /etc/fstab file
that is used my the operating system on bootup to connect the physical disks to the
filesystem.
pi@raspberrypi~$ sudo vi /etc/fstab
This will show the following
-----------------------------------------------------
proc /proc proc defaults 0 0
/dev/mmcblk0p1 /boot vfat defaults 0 0
#/dev/mmcblk0p3 none swap sw 0 0
-----------------------------------------------------
We need to add the bottom 2 lines for the 2 disk drives, please note that the
entry vfat or ntfs-3g is dependant on your disk type and should be modified
accordingly.
If you have only attached one device only create the relevent entry for that disk.
-----------------------------------------------------
proc /proc proc defaults 0 0
/dev/mmcblk0p1 /boot vfat defaults 0 0
#/dev/mmcblk0p3 none swap sw 0 0
/dev/sda1 /mnt/disk1 ntfs-3g defaults 0 0
/dev/sdb1 /mnt/disk2 vfat defaults 0 0
-----------------------------------------------------
To make the files visible to the filesystem type
pi@raspberrypi~$ sudo mount -a
This will try to mount the new devices into /mnt/disk1 and /mnt/disk2 - so to test if
it has worked type
pi@raspberrypi~$ ls /mnt/disk1
This should now list any files on the disk that you have put there. If this is not the case
then check that the disk types are correct in /etc/fstab
6. Now we need to install a software package called samba which will allow a unix box to share windows
files.
pi@raspberrypi~$ sudo apt-get install samba
Wait while stuff flies up the screen and type y at any yes/no prompts
Depending on the Distro you are using you may need to install this, so do it anyway.
pi@raspberrypi~$ sudo apt-get install samba-common-bin
7. When all is complete then the samba package has been installed so will need configuring
for your setup, so you will need to edit the /etc/samba/smb.conf file.
pi@raspberrypi~$ sudo vi /etc/samba/smb.conf
The things that possibly need changing are the workgroup entry set to WORKGROUP for XP and
previous operating systems and HOME for Windows 7 and above (not sure what is the default for Vista).
Then i would comment out the following lines by adding a ; to the front of the item as this makes
initial setup and testing easier.
------------------------------------------------------
;[homes]
; comment = Home Directories
; browseable = no
;[printers]
; comment = All Printers
; browseable = no
; path = /var/spool/samba
; printable = yes
; guest ok = no
; read only = yes
; create mask = 0700
;[print$]
; comment = Printer Drivers
; path = /var/lib/samba/printers
; browseable = yes
; read only = yes
; guest ok = no
;[cdrom]
; comment = Samba server's CD-ROM
; read only = yes
; locking = no
; path = /cdrom
; guest ok = yes
; preexec = /bin/mount /cdrom
; postexec = /bin/umount /cdrom
------------------------------------------------------
Then finally at the end add your windows share name - i will use a share name of usb and
will share out the content of /mnt/disk1 - to share the other disk, add another entry
as below with the share name within the [ ] and the path to the other disk drive.
------------------------------------------------------
[usb]
comment = USB Share
path = /mnt/disk1
writeable = Yes
only guest = Yes
create mask = 0777
directory mask = 0777
browseable = Yes
public = yes
------------------------------------------------------
8. At last we can restart samba and test the configuration so to restart samba.
pi@raspberrypi~$ sudo service samba restart
and to check the shares and configuration run
pi@raspberrypi~$ sudo testparm -s
this should show something similar to that below
------------------------------------------------------
Load smb config files from /etc/samba/smb.conf
rlimit_max: rlimit_max (1024) below minimum Windows limit (16384)
Processing section "[usb]"
Loaded services file OK.
Server role: ROLE_STANDALONE
[global]
server string = %h server
obey pam restrictions = Yes
pam password change = Yes
passwd program = /usr/bin/passwd %u
passwd chat = *Enter\snew\s*\spassword:* %n\n *Retype\snew\s*\spassword:* %n\n *password\supdated\ssuccessfully* .
unix password sync = Yes
syslog = 0
log file = /var/log/samba/log.%m
max log size = 1000
dns proxy = No
wins support = Yes
panic action = /usr/share/samba/panic-action %d
[usb]
comment = USB Share
path = /mnt/disk1
read only = No
create mask = 0777
directory mask = 0777
guest only = Yes
guest ok = Yes
------------------------------------------------------
If you get the above info then you need to add the pi user to the samba user database
which is not the same as the pi username/password but can be so
pi@raspberrypi~$ sudo smbpasswd -a pi
This will add a pi user with the password you typed in for windows to connect with.
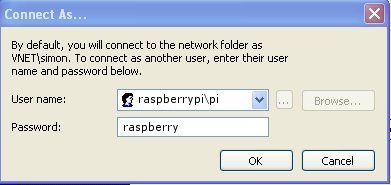
Now try connecting to the server using windows map network
drive. On Windows XP you will see the following. So type \\raspberrypi\usb in
the Folder field.
Now click on the [Connect using a different user name] link
and enter raspberrypi\pi in the user name field and raspberry in the password
field.
NOTE: windows will always by default try your username and password
from your PC to make the connection (in my case my PC is called VNET and my
username is simon so you see VNET\simon in the window), and as we only
have the one user on the Raspberry Pi, we have to specify that the user connecting is
one that exists on the Pi. We also have to also specify the machine that the user is
on before the user name therefore the username is raspberrypi\pi.
Then click [OK] which will close the pop-up and
[Finish], this should now map your drive to the Raspberry
Pi NAS server.
9. Right the samba share is working, however if you reboot the Pi then the
drive will not be auto mounted, and therefore the share will be empty - so we will
need to install a command called autofs which is designed to automatically mount
usb disk drives.
pi@raspberrypi~$ sudo apt-get install autofs
This will install the auto usb mounting system.
9. However we need to set up a config file to allow the automounting of
the usb disk.
pi@raspberrypi~$ sudo vi /etc/auto.master
At the end of the file is the following
------------------------------------------------------
+auto.master
------------------------------------------------------
You need to add the following below the +auto.master entry
------------------------------------------------------
+auto.master
/media/ /etc/auto.ext-usb --timeout=10,defaults,user,exec,uid=1000
------------------------------------------------------
Now you can reboot and the server will keep on working and sharing your windows
files on boot
If you dont want your server called raspberrypi then change its name by reading
"How2Setup Rename my Pi".
|
|
|
© simonthepiman.com 2012->2026
email: simon@villagenet.co.uk
|
|  | The
Raspberry Pi Foundation is a UK registered charity which exists to promote the
study of computer science and related topics, especially at school level, and to put
the fun back into learning computing.
Please Note:- any mention of the Raspberry Pi computer on these pages refers to the
Raspberry Pi Foundation's product, who also have trademark rights to the term 'Raspberry Pi'.
|
|
|
|