How2Setup a backup of my Raspberry Pi SDCard
One of a set of simple easy to use guides for beginners to set up a Raspberry Pi computer.
OK I have spent a load of time setting up my Pi and I want to keep a backup
of this configuration so i can rebuild my Pi quickly in case I mess it up
1. We have to remove the SDCard from the Pi so please shut it down
pi@raspberrypi~$ sudo shutdown -h now
2. We have a running Pi image on the SDCard, now we need to install
PC software to write this image to an SDCARD.
So lets download My recommended Writer software is [HDD Raw Copy Tool] from
hddguru.com so open this
link in a new window - and then scroll down to the link
Download Windows
Executable (works without installation): and click there to download the program
to your PC
3. Lets run the program - but firstly insert your Pi SD Card in the PC's
card reader slot, then start by double clicking on the program
HDDRawCopy1.02Portable.exe and agree to Security Warning by pressing [Run]
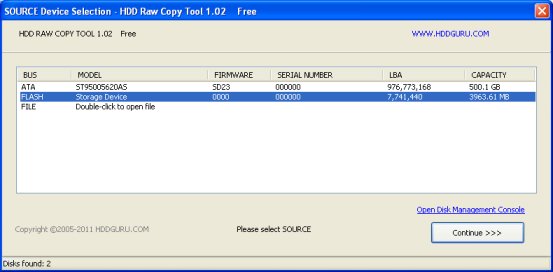
and it will open the following window

This is the SOURCE image so we need to single click the FLASH Storage Device
4. Now we need to click on [Continue > > >],
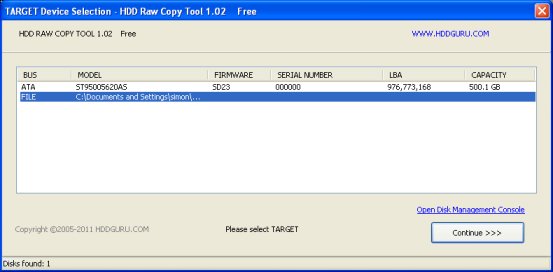
then you should see the following screen.

5. This is the TARGET screen, so we need to click on the
FILE device then double
click on it and add a filename to save your backup to (I suggest the OS Version)
followed by a - and the date and description, so you can find it again if needed,
so something like Wheezy-20120801-backup.
. Leave the compressed option
set then press [Save].
You will then return to the screen from step 3, so just press
the [Continue > > >] button to start
saving the image.
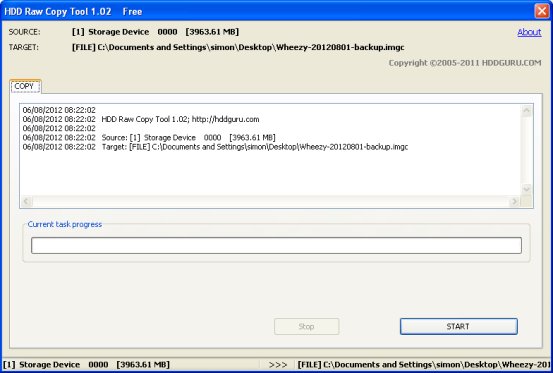
6. You should see the following screen

so check that the SOURCE and TARGET are correct and that you are NOT overwriting your
PC's hard drive.
-----------------------------------------------------
06/08/2012 08:22:02 Source: [1] Storage Device 0000 [3963.61 MB]
06/08/2012 08:22:02 Target: [FILE] C:\Documents and Settings\simon\Desktop\Wheezy-20120801-backup.imgc
-----------------------------------------------------
If you are happy with this just press the [Start] button,
and you will see the progress bar moving, and details of the copy in the lower part of
the window
Now just leave this until the [Start] button
is not greyed out, and the [Stop] button disappears, and the
lower display shows 100% complete. Its worth checking for errors in the top part of
the display.
7. You can now close the program and remove your SD Card as the image of your
Pi is now backed up on your PC. Plug the SDCard back into your Pi and power on.
NOTE:- using compression your, in my case 4Gb image is stored as about 80Mb, an efficient
backup I think.
|
|