|
|
|
|
 |
Simon the Pi Man
To Infinity (probably) and beyond
(A beginners Resource for the Raspberry Pi computer using the Debian distro)
|
|
If you are looking for info on the Raspberry Pi computer
stay on this site
however
If you are looking for a good cafe in
Rye in
East Sussex try
"Simon the Pie man" near the church.
|
|
| | Basic Setup->1. Setting up your Pi |
|
Absolute Beginners Guide - Setting up the Pi for the first time
One of a set of simple easy to use guides for beginners to set up a Raspberry Pi computer.
Using the Raspbian - Debian Wheezy Version: January 2014 Release date:2014-01-07 (not the NOOBS version)
1. I have taken my pi out of its box now how do i set it up ?
2. The first thing I need to do is create a bootable sdcard, so please go to How2Setup a bootable Debian distribution for your Raspberry Pi
or buy a pre-loaded image from various suppliers.
3. OK I now have an sdcard with the image on it, my pi and a suitable power supply, please take a look at this page The Raspberry Pi computer and its power requirements
4. The next step is to insert the sdcard so it contacts the pi board.
5. Next step plug a suitable hdmi cable into the Pi and into a PC screen or TV so we can see what is going on.
6. We need a keyboard for input so plug a usb keyboard into the Pi.
7. To ensure the pi will work properly please plug it into your broadband router using an Ethernet cable.
8. Ok final checks - sdcard in - keyboard plugged in - hdmi plugged in - ok NOW LETS GO - plug the power lead in.
9. If all working ok we now get the standard Debian scrolling bootup messages on the screen - dont worry what they mean, its basically checking everything is starting ok.
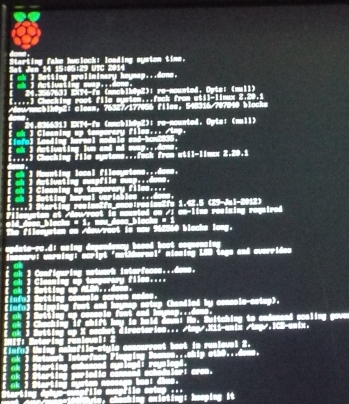
10. If everything is working ok we should get the following screen to display, this is the
pi@raspberrypi:~$ raspi-config program that allows you to setup or change your Pi
OH NO its expecting me to do something !!!!!!!!!!!!!!! WHAT DO I DO NOW ?????.
11. Lets start off by setting up a pi as a server which doesnt need graphics so we need to
carry out the next steps.
NOTE:- the menu uses the [Up] and [Down] arrows to move up and down the menu options
[Space] to select items and [Tab] to move through fields.
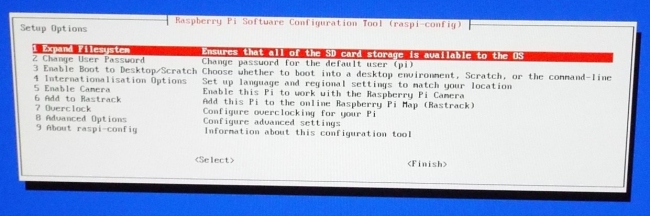
12. We had better start with the top item "1. Expand Filesystem" this will allow the pi to make use of the whole sdcard, even if the partition sizing on the image you have is incorrect for your pi.
So lets move the cursor up and down to select this item and just select it by pressing the [Enter] key.
The screen flashes and its done (well it will be once you have rebooted the pi).
13. The next thing we need to do is "3. Enable boot to Desktop or Scratch".
Basically this is asking if you want either a pi with or without a GUI(Graphical User Interface) or to boot directly into the Scratch programming environment.
We are not really interested in the GUI or Scratch when we are building servers so we select this option and then a second screen appears
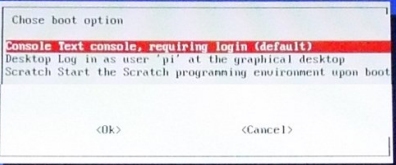
Luckily the default is to use a text console(via putty from a PC) so we can just [Cancel] and return to the main menu.
14. What next I hear you ask - right lets ignore "4. Internationalisation" if we are in the UK as it defaults to UK settings. Also ignore "5. Enable Camera" as we are not going to use the Raspberry Pi Camera, and also "6. Add to Rastrack" which records the location of your pi on google maps - interesting but we will ignore it until we have setup our pi
However option "7. Overclock" looks interesting so lets see whats there so choose this option and you will see the following

I personally am a little uncomfortable overclocking a chip in a massive way as it could potentially melt the processor, and i would rather have longevity for a server, so I will choose the "Modest 800mHz" overclocking rate which will improve the speed hopefully without doing too much damage. I would guess that if you are using a fan to cool the pi then the Turbo option is for you, but most Pi cases do not seem to have good cooling slots.
15. Lets now go into something that looks interesting "8. Advanced Options"
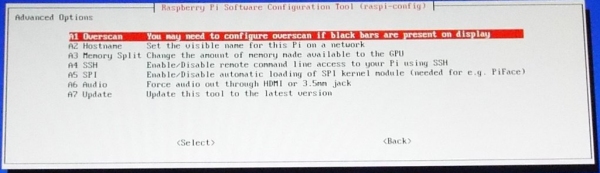
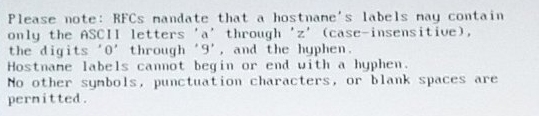
We can ignore the first option as its for screen based systems, but lets rename this pi to describe what its for when we login, in my case I will be using this as a samba (windows file) server. So on selecting the "A2 Hostname" option we see a warning message
Click on [OK] and the change name screen is shown which I have changed to pi-samba
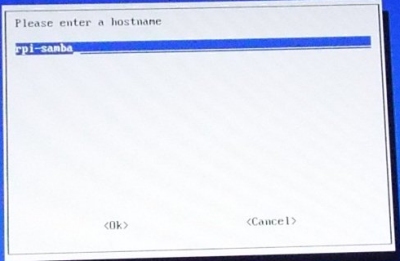
Just Click on [OK] and its done.
16. Go back into "8. Advanced Options"
So lets select the "A3 Memory Split" option as our server will use tiny amounts of graphics memory
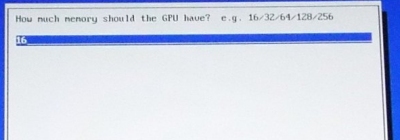
and we change the memory available to the GPU(Graphics Processing Unit) to 16Mb this means that processing will have more memory available to it so should be much more effective.
17. Go back into "8. Advanced Options"
So finally select the "A4 SSH" option as SSH will be used by us to access this pi over our network

select the [Enabled] option, then back to the main menu and click on [Finished], the pi will reboot and set itself up with our configuration.
18. OK we have a rebooted pi sitting at the login prompt, for us to access this pi remotely we need to know the IP address that your router has given it .
So log into the pi with its default username of pi and the default password of raspberry. You will now see that you are logged in
pi@rpi-samba~$
To see the IP address that your broadband router has given your pi, type
pi@rpi-samba~$ sudo ifconfig -a
This will display your pi's network interfaces.
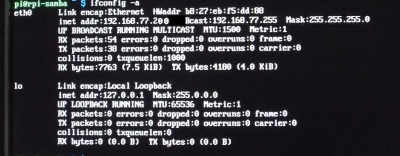
FINALLY make a note of the numbers that says "inet addr" in my case 192.168.77.200
You can now access your pi remotely from a PC see How2SetUp remote access to a Raspberry Pi computer
|
|
|
© simonthepiman.com 2012->2026
email: simon@villagenet.co.uk
|
|  | The
Raspberry Pi Foundation is a UK registered charity which exists to promote the
study of computer science and related topics, especially at school level, and to put
the fun back into learning computing.
Please Note:- any mention of the Raspberry Pi computer on these pages refers to the
Raspberry Pi Foundation's product, who also have trademark rights to the term 'Raspberry Pi'.
|
|
|
|